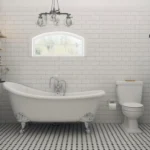


Alright, let’s have a real chat. You’re here because you’ve stared into the abyss of all-white, beige, and gray bathrooms, and the abyss stared back, utterly bored. You’re craving something with a bit of personality, a splash of life, and a touch of nature. You’re thinking… green. And let me tell you, you’ve come to the right place.
I’ve been obsessed with interior design for years, and my personal crusade is to rescue homeowners from the clutches of monotonous neutrals. Green tile is one of my favorite secret weapons. It’s not just a color; it’s a whole mood. It can be calming, vibrant, retro, or ridiculously luxe. The problem? With so many shades and styles, where do you even start?
Don’t worry, I’ve got you. We’re going to walk through 15 incredible green tile bathroom designs that will get your creative gears turning. Forget the generic blog posts. This is a conversation between two people who just want to create a bathroom that doesn’t look like it came straight out of a witness protection program catalog.
1. Emerald Elegance Bathroom Design
First up, the drama queen of the green tile world: emerald. This isn’t a color for the faint of heart. Choosing emerald green tile is like deciding to wear a velvet suit to a casual brunch. It’s a statement. It’s bold. And it is absolutely fabulous.
An emerald green bathroom feels opulent and deeply sophisticated. The color is so rich that it immediately elevates the space, making it feel custom and expensive. I’ve seen this work wonders in both master ensuites and tiny powder rooms where you want to create a jewel-box effect.
How to Nail the Emerald Look
To stop it from feeling like a cave, you need to balance that deep, saturated color. Here’s how you pull it off without a hitch:
- Tile Choice: Go for a high-gloss finish. The way light bounces off a glossy emerald tile is just chef’s kiss. It adds depth and prevents the dark color from absorbing all the light in the room. Zellige tiles are a fantastic option here, as their handmade imperfections add a shimmering, water-like texture.
- Fixture Finish: Brass or gold fixtures are non-negotiable, IMO. The warm metal against the cool, deep green creates a classic, high-contrast look that screams luxury. Think brushed gold faucets, showerheads, and even towel racks.
- Lighting is Key: You need excellent lighting. I’m talking about a statement chandelier or elegant sconces flanking the mirror. Good lighting will make the tiles glitter and bring the whole room to life.
- Accent Materials: Pair emerald with natural materials like marble or rich walnut wood. A marble countertop or a walnut vanity can provide a beautiful, organic counterpoint to the intensity of the green.
The big takeaway here is that emerald green is for creating a bold, luxurious statement. It’s not about blending in; it’s about standing out.
2. Mint Green Minimalist Bathroom
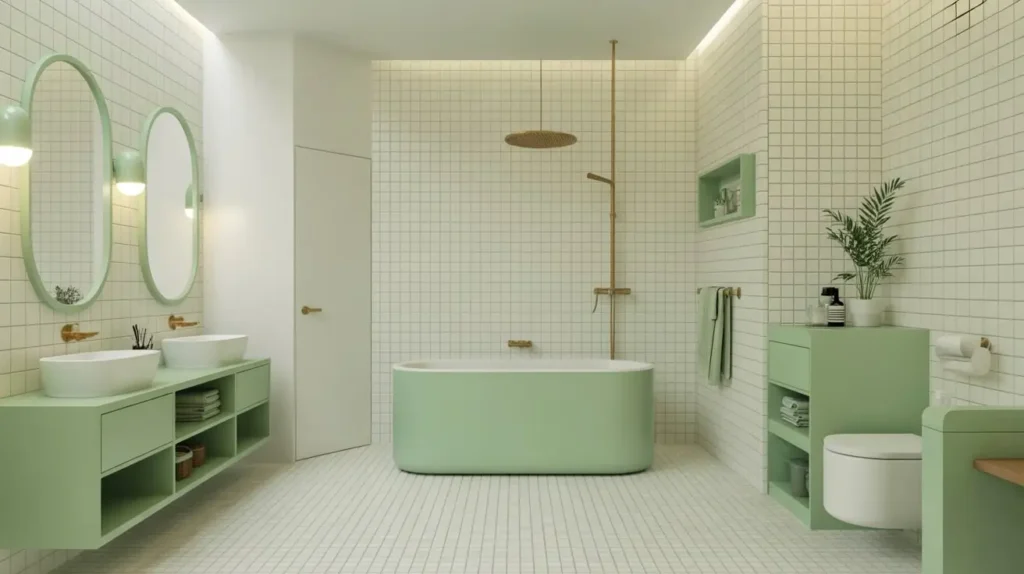
Now, let’s swing the pendulum to the complete opposite end of the spectrum. If emerald is the dramatic lead, mint green is the cool, collected best friend. It’s fresh, it’s airy, and it plays beautifully with minimalist design. Ever wondered why Scandinavian design feels so clean and calming? It’s often because of soft, nature-inspired palettes like this.
A mint green bathroom is perfect for anyone who wants a pop of color without sacrificing a sense of calm and simplicity. It’s youthful without being childish and modern without being cold. It reminds me of spring mornings and that first scoop of mint chocolate chip ice cream. Okay, maybe I’m just hungry.
Achieving a Fresh, Clean Aesthetic
This look is all about simplicity and light. You’re not trying to wow with drama; you’re trying to soothe the soul.
- Tile Shape: Simple shapes work best. Think classic subway tiles, clean squares, or maybe a subtle penny tile for some texture on the floor. The color is the star, so the tile shape can be a supporting actor.
- Grout Color: White or a very light gray grout is your best bet. A dark grout would create a busy grid effect that fights against the minimalist vibe. You want the tiles to blend into a soft, cohesive surface.
- Material Pairings: Light-colored woods, like birch or light oak, are a perfect match. A floating light wood vanity keeps the space feeling open. For fixtures, chrome or matte black provides a clean, modern contrast.
- Keep it Uncluttered: This is crucial. Minimalism means less stuff. Use clever storage solutions like recessed medicine cabinets and built-in shelving to keep your countertops clear.
The goal with mint green is achieving a fresh, clean, and airy aesthetic. It’s the perfect way to make a smaller bathroom feel bigger and brighter.
3. Forest Green Accent Wall Ideas
Feeling a little color-shy? Or maybe you’re working with a bathroom that you don’t want to completely overwhelm with a dark color. Say hello to the forest green accent wall. It’s the design equivalent of dipping your toes in the water before committing to a full swim.
I love this approach because it gives you all the moody, earthy drama of a deep green without making the entire room feel smaller or darker. By focusing the color on one wall—typically behind the vanity or in the shower—you create an instant focal point that draws the eye and adds a ton of character.
Making One Wall the Hero
This is all about strategic placement and contrast. You’re essentially framing a piece of art, but the art is your tile.
- Which Wall to Choose? The wall you see when you first walk in is a great candidate. The wall behind your vanity is another classic choice, as it creates a stunning backdrop for your mirror and sink. Tiling the back wall of a shower nook is also a fantastic way to add depth.
- Tile Texture Matters: With a deep forest green, consider a tile with some texture. A vertically stacked subway tile can make the ceiling feel taller. A matte finish can feel very modern and earthy.
- A herringbone or chevron pattern can turn a simple accent wall into a true showstopper.
- Keep Everything Else Light: This is the key. To make that forest green wall pop, the other walls should be a crisp white or a very light, warm gray. The floor tile should also be neutral. This contrast is what gives the accent wall its power.
Using a forest green tile accent wall is about creating a dramatic focal point without overwhelming the room. It’s a smart, high-impact design choice.
4. Green Subway Tile Shower Inspiration

Ah, the humble subway tile. It’s the blue jeans of the tile world—classic, versatile, and it never really goes out of style. But when you render it in a beautiful shade of green, it suddenly feels fresh and new all over again. A green subway tile shower is a fantastic way to inject color and personality into your bathroom.
What’s great about this is the sheer versatility. A light sage green subway tile feels spa-like. A deep olive green feels earthy and sophisticated. A bright kelly green feels fun and energetic. You can’t really go wrong. I recently helped a friend design a shower with glossy olive green subway tiles, and the way the water runs over them is just mesmerizing.
Beyond the Basic Brick Pattern
Sure, you can do the classic brick layout, and it will look great. But why not have a little fun?
- Vertical Stack: Instead of offsetting the tiles, stack them directly on top of each other in a grid. This creates a very clean, modern, and architectural look. It also has the added benefit of drawing the eye upward, making the shower feel taller.
- Herringbone Pattern: This classic pattern adds a sense of movement and elegance. It’s more labor-intensive to install (and thus more expensive), but the result is undeniably stunning.
- Crosshatch or Basketweave: For a more intricate and traditional look, you can lay tiles in a basketweave pattern. This adds a ton of texture and visual interest.
- Grout is Your Secret Weapon: The grout color dramatically changes the final look. Contrasting grout (like white or black) will emphasize the pattern and shape of each tile. Matching grout will create a more monolithic, seamless color field.
A green subway tile shower proves that a classic shape in a bold color is a timeless combination. It’s reliable, stylish, and offers endless possibilities for customization.
Read Also 15 Sophisticated Black Tile Bathroom Designs to Copy
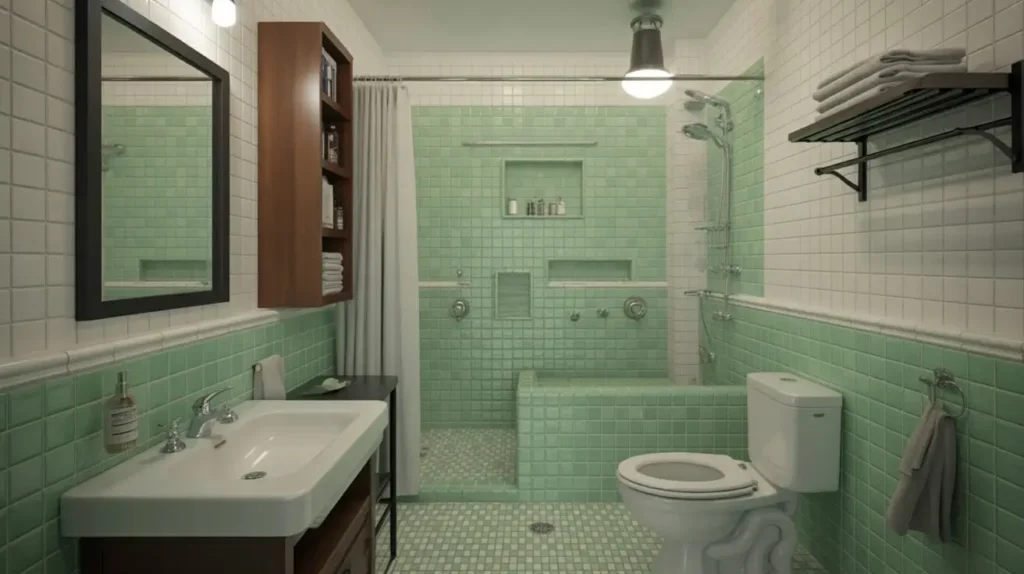
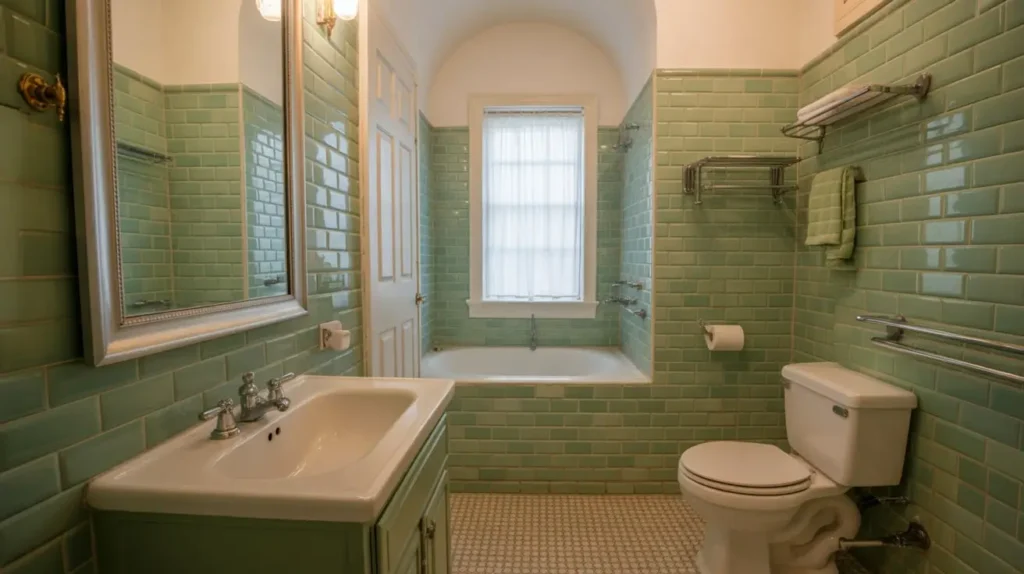
5. Vintage Green Bathroom Makeover

Let’s get a little nostalgic, shall we? For decades, green was the bathroom color. I’m talking about the soft seafoam of the 1950s and the infamous avocado green of the 1970s. For a while, people ran screaming from these colors, but guess what? They’re back. But this time, they’re chic.
A vintage green bathroom makeover is about embracing the charm of the past while updating it for the present. It’s less about a perfect historical recreation and more about capturing a feeling. Think of it as a modern love letter to your grandma’s bathroom, but with way better plumbing.
How to Do Vintage Without Being Dated
The line between “charming vintage” and “just plain old” can be thin. Here’s how you stay on the right side of it.
- Choose the Right Green: Look for those slightly dusty, muted greens. Seafoam, pale jade, or a soft moss green are fantastic choices. They have that retro feel without the aggressive saturation of 1970s avocado.
- Tile Shape and Size: The classic 4×4 inch square tile is the quintessential vintage look. Pair it with a contrasting border tile in black or white for extra authenticity. Penny rounds or small hexagons on the floor also scream mid-century.
- Modern Fixtures, Vintage Feel: This is key. You don’t need to install a fussy, leaky vintage faucet. Instead, choose modern fixtures that have a nod to vintage design. A cross-handle faucet or a classic pedestal sink can bridge the gap between old and new.
- Accessorize Thoughtfully: A sunburst mirror, some botanical prints, or even a kitschy flamingo figurine can complete the look. Just don’t overdo it, or you’ll venture into theme-park territory.
The charm of a vintage makeover lies in thoughtfully blending retro colors and patterns with modern functionality. It’s playful, unique, and full of personality.
6. Sage Green Spa-Like Retreat

If your primary goal for your bathroom is to have a place to decompress and escape the chaos of the world, then sage green is your color. It’s the yoga instructor of the green family: calm, centered, and effortlessly zen.
Sage green is a grayish, muted green that is deeply rooted in nature. It’s incredibly soothing on the eyes and promotes a sense of tranquility. I find that it’s almost impossible to feel stressed in a well-designed sage green bathroom. It’s the perfect color for creating a personal spa-like retreat right in your own home.
Crafting Your Personal Sanctuary
This design is all about soft textures, natural materials, and creating a serene atmosphere.
- Tile Finish: A matte finish is often the best choice for sage green. It has a soft, velvety look that enhances the calming properties of the color. It doesn’t reflect a lot of light, which contributes to a more subdued and relaxing environment.
- Pair with Natural Elements: This is crucial for the spa vibe. Think about bringing in:
- Wood: A teak shower bench or a light oak vanity.
- Stone: A river rock shower floor or a stone vessel sink.
- Plants: Lots of live plants! Ferns, snake plants, and eucalyptus thrive in humid bathroom environments and enhance the connection to nature.
- Textiles are Important: Invest in plush, fluffy white towels, a soft bath mat, and maybe a linen shower curtain. These tactile elements add to the overall sense of comfort and luxury.
- Lighting and Scent: Install a dimmer switch for the lights so you can create a low-light ambiance for relaxing baths. An essential oil diffuser with calming scents like lavender or eucalyptus completes the sensory experience.
A sage green bathroom is about creating a calm, restorative space that connects you to nature. It turns your daily routine into a mindful ritual.
7. Dark Green Modern Bathroom Trends
Let’s dive back into the deep end. While emerald green is about opulent drama, dark greens like hunter, olive, and forest green can be used to create a look that is decidedly modern, moody, and masculine. It’s less about glitz and more about a grounded, earthy sophistication.
A dark green modern bathroom feels confident and enveloping. It’s like being in a secluded cabin in the woods, but with much better water pressure. This look works exceptionally well with clean lines, minimalist fixtures, and a focus on texture over pattern.
Mastering the Moody and Modern Vibe
Going dark can be intimidating, but when you do it right, the payoff is huge. The secret is contrast and texture.
- Embrace Large Format Tiles: To create a clean, seamless look, consider large format tiles. Fewer grout lines mean a less busy, more monolithic appearance, which feels very modern. This works on both floors and walls.
- Matte Finishes Rule: A matte or honed finish on a dark green tile feels incredibly chic and contemporary. It absorbs light in a way that makes the color feel deep and rich, without the potential for dated-looking shine.
- Fixtures: Go Black: Matte black fixtures are the perfect partner for dark green. Black faucets, shower frames, and hardware create a sharp, graphic contrast that is the hallmark of modern design. It’s a powerful and confident combination.
- Introduce Warmth with Wood: To prevent the space from feeling cold or stark, introduce a warm wood tone. A floating vanity in a medium-toned walnut or teak can add organic warmth and prevent the black-and-green combo from feeling too severe.
The essence of this style is using deep, saturated green and sharp, clean lines to create a sophisticated and moody atmosphere.
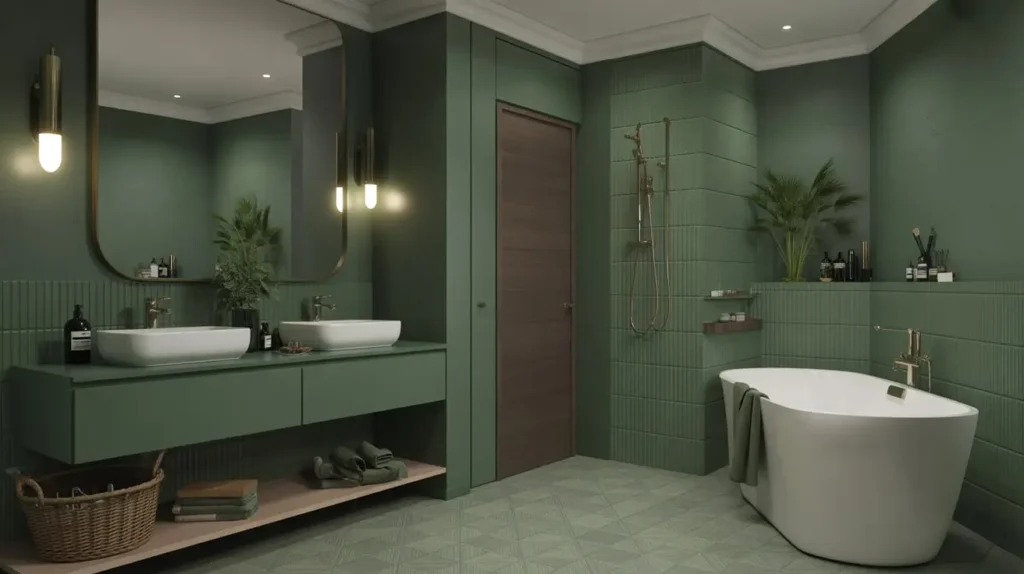
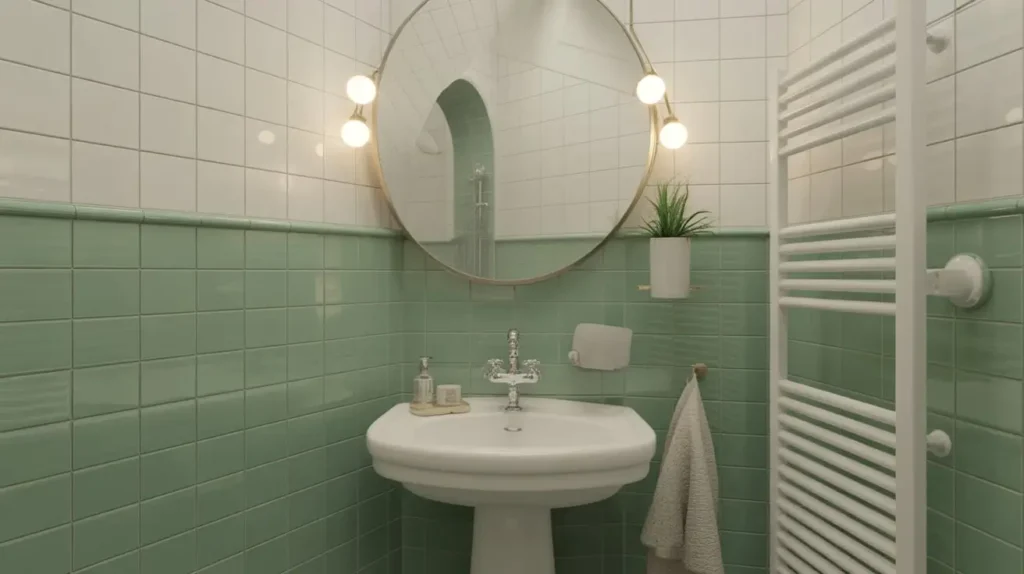
8. Green and White Tile Combinations

Can’t decide between a colorful bathroom and a classic white one? Why not have both? Green and white is a timeless color combination that always looks fresh and clean. It’s a way to introduce a vibrant color while still keeping the space feeling bright and open.
The beauty of this pairing is its versatility. You can create looks that are classic, modern, retro, or playful, all by changing the way you combine the two colors. It’s a design partnership where both colors bring out the best in each other.
Creative Ways to Combine Green and White
Forget just tiling one wall green and the rest white. Let’s get more creative.
- The Classic Checkerboard: A green and white checkerboard floor is a bold, graphic statement with a delightful retro kick. It works with almost any shade of green, from mint to forest.
- Stripes: Vertical or horizontal stripes can create a strong visual impact. You could do wide bands of color or alternate single rows of tile for a pinstripe effect. Vertical stripes can make a low ceiling feel higher.
- Framing and Borders: Use green tile to frame a section of white tile, like in the shower or behind the tub. Or, use a simple green border tile around a field of white to add a subtle, tailored touch.
- Half-Tiled Wall (Wainscoting): A very classic and elegant look is to tile the bottom half of the wall in green and paint the top half a crisp white. This is a great way to ground the space with color while keeping it feeling airy.
The key to a successful green and white bathroom is using pattern and placement to create a dynamic, balanced interplay between color and neutral.
9. Patterned Green Mosaic Bathroom Tiles
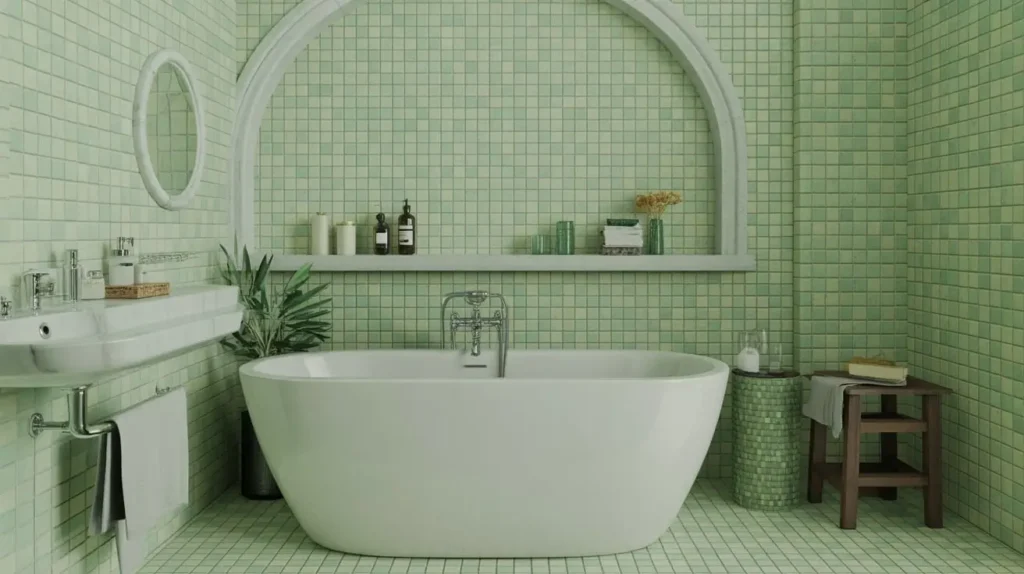
If you really want to make a statement and show off your creative flair, mosaic tile is your medium. Patterned green mosaic tiles can turn a floor or wall into a breathtaking work of art. We’re talking intricate florals, bold geometrics, and everything in between.
This isn’t a budget-friendly option, let’s be clear. Mosaic work is detailed and often expensive, both in materials and labor. But for a powder room, a shower floor, or a feature wall, the impact is unparalleled. It instantly adds a custom, high-design feel to the space.
Making Mosaics Work for You
A little bit of mosaic can go a long way. The key is to let it be the undisputed star of the show.
- Where to Use It: Because of the cost and visual weight, you don’t want to tile your entire bathroom in a busy mosaic. Choose one area to be your focal point:
- The entire floor of a small powder room.
- A “rug” inlay in the center of a larger bathroom floor.
- A vertical panel inside the shower.
- The backsplash behind the vanity.
- Scale of the Pattern: In a small space, a small-scale, intricate pattern can sometimes feel too busy. A larger-scale geometric or floral pattern can actually make the space feel more expansive. Test samples in your space before committing!
- Keep Everything Else Simple: When you have a showstopper like a patterned green mosaic, everything else in the room needs to be quiet and simple. Plain walls, simple fixtures, and minimal decor will allow the tile to shine without competition.
Using patterned green mosaics is about making a bold, artistic statement in a focused area. It’s a splurge, but one that delivers maximum impact. 😉
Read Also 15 Gorgeous Hexagon Tile Bathroom Designs to Try Now
10. Small Bathroom Green Tile Solutions
“But my bathroom is tiny!” I hear you cry. Don’t worry, a small bathroom doesn’t sentence you to a life of plain white tile. In fact, using color smartly can make a small space feel more interesting and thoughtfully designed. The trick is to use green in a way that enhances the space rather than closes it in.
I’ve seen so many people default to all-white in a small bathroom, thinking it’s the only way. The result is often a boring, sterile box. A little bit of green can give that small space the personality it’s desperately craving.
Tricks to Make Green Work in a Small Space
You just need to be a bit more strategic with your choices.
- Go Glossy: This is my number one tip. Glossy or glazed tiles reflect light, which helps to make a small, often windowless, bathroom feel brighter and a bit bigger. A glossy light green tile can work wonders.
- Lighter Shades are Your Friend: While you can go dark in a small space for a dramatic jewel-box effect, it’s a riskier move. Lighter shades like mint, sage, or a pale seafoam are a safer bet for maintaining a sense of openness.
- Think Vertically: As I mentioned earlier, laying rectangular tiles in a vertical stack draws the eye upward, creating the illusion of a higher ceiling. This is a brilliant trick for cramped spaces.
- Consistent Floor and Wall Tile: Using the same tile on the floor and at least one of the walls can blur the lines of the room, making it feel more expansive. The continuous surface fools the eye into seeing a larger space.
The solution for small bathrooms is using light-reflecting finishes and clever tile placement to add color without sacrificing the sense of space.
11. Green Hexagon Tile Bathroom Designs
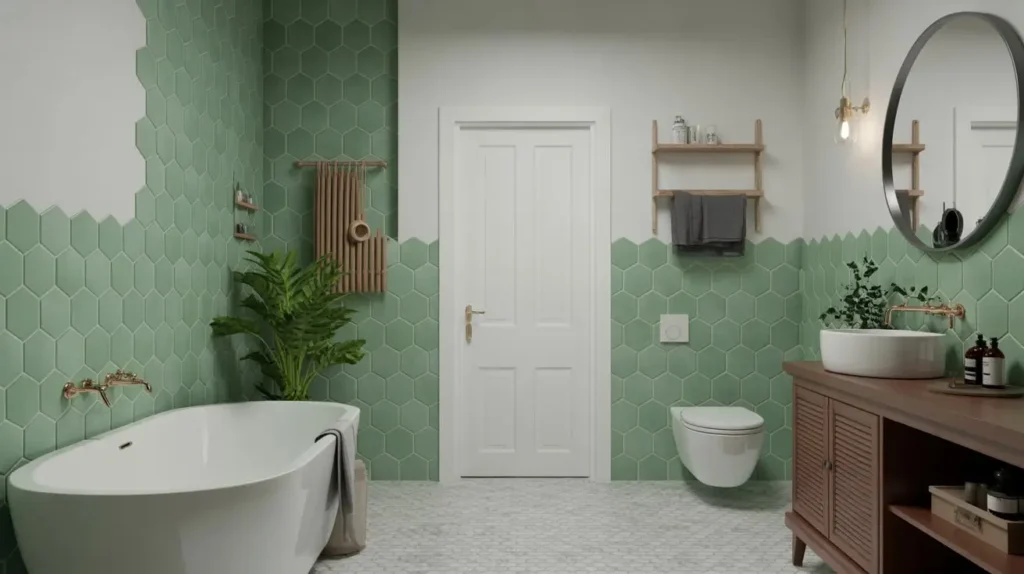
Tired of squares and rectangles? Enter the hexagon tile. It’s a fun, geometric alternative that adds instant visual interest and a modern-yet-timeless feel. Green hexagon tiles, or “hex tiles,” are a fantastic choice for both floors and walls.
There’s something so satisfying about the honeycomb pattern they create. It’s geometric without being harsh, and it provides a beautiful texture and rhythm to a surface. I personally love a green hex tile floor; it’s a great way to add pattern and color underfoot.
Playing with Hexagons
Hex tiles offer some unique design opportunities beyond just a single color.
- Scale is Everything: Hexagon tiles come in a huge range of sizes, from tiny one-inch mosaics to large eight-inch floor tiles. Small hex tiles create a busy, textured look perfect for shower floors (the extra grout lines add grip!). Larger hex tiles create a bold, graphic pattern that works well on the floors of larger bathrooms.
- The Honeycomb Fade: A really popular and beautiful technique is to create a fade effect. You can start with green hex tiles in one area (like near the tub) and have them randomly dissipate into a field of white hex tiles as they move across the floor. It’s an organic, custom look.
- Mix and Match: Don’t be afraid to create your own pattern. You can sprinkle in a few white or black hex tiles into your field of green to create a random or repeating pattern.
- Wall to Floor: For a very dramatic and cohesive look, you can run the same green hexagon tile from the floor right up one of the walls. This is a bold move that really makes a statement.
Green hexagon tiles are perfect for adding geometric pattern and a touch of playful sophistication to your bathroom design.
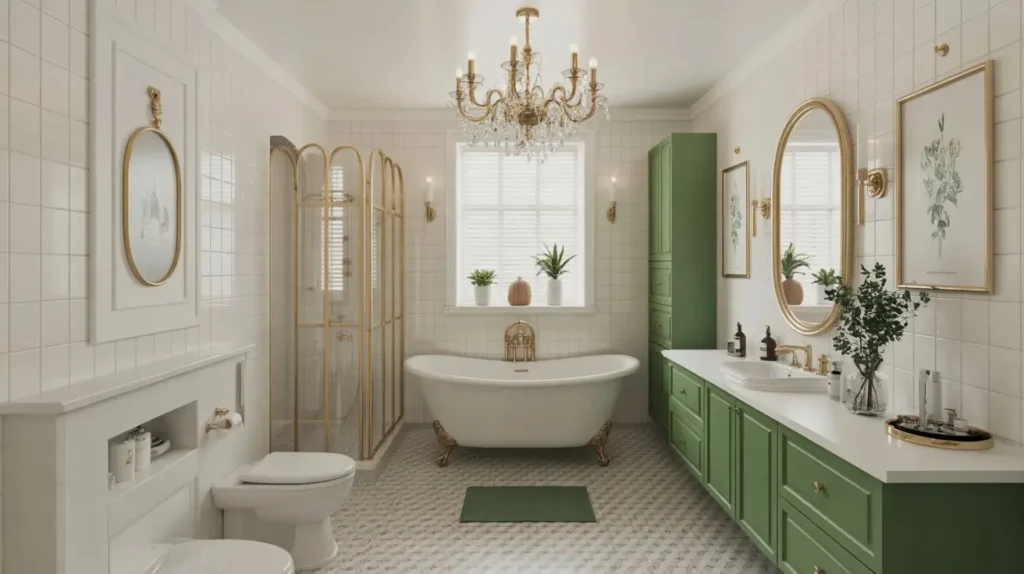
12. Green Bathroom with Gold Fixtures
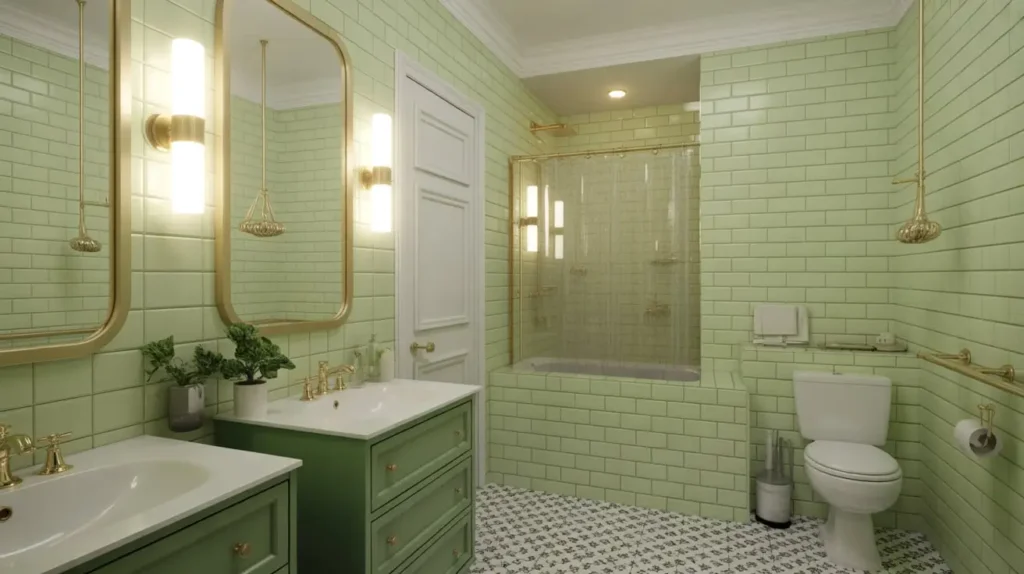
We touched on this with the emerald green design, but this combination is so good it deserves its own section. Pairing green tile with gold or brass fixtures is a match made in design heaven. Why does it work so well? It’s classic color theory in action.
Most greens have cool undertones. Gold and brass are inherently warm. When you put them together, you get a beautiful, balanced contrast that feels both rich and inviting. It’s a look that can be glamorous, traditional, or even a bit bohemian, depending on the shade of green and the style of the fixtures.
Getting the Gold and Green Combo Just Right
It’s more than just picking any green and any gold. The details matter.
- Fixture Finish: The finish of your gold hardware makes a big difference.
- Polished Brass: Bright, shiny, and very glamorous. It pairs beautifully with deep emerald or forest greens for a high-drama look.
- Brushed or Satin Gold: A more subdued, modern finish. It has a soft glow that works wonderfully with softer greens like sage or olive.
- Unlacquered Brass: This is a living finish that will patina and change over time, developing a unique character. It’s perfect for a more vintage or rustic green tile bathroom.
- Shade of Green: A deep, dark green with polished brass feels formal and luxurious. A mid-tone olive green with brushed gold feels earthy and modern. A light mint green with satin gold feels fresh and a bit art deco. The shade of green dictates the mood.
- Don’t Forget the Details: Carry the gold through to all the details for a cohesive look—the mirror frame, the light fixtures, the cabinet hardware, the towel hooks. Consistency is what makes it feel intentional and professionally designed.
The combination of green tile and gold fixtures is a classic for a reason: it creates a perfect balance of warm and cool tones for a look that is perpetually stylish.
13. Retro Green Tile Bathroom Vibes
This is a little different from the “Vintage Makeover.” While the vintage look is about a soft, charming nostalgia, the “retro” vibe is about embracing the bold, funky, and often quirky designs of the ’60s and ’70s. It’s less about being pretty and more about being fun.
Think bright, saturated greens like kelly green or chartreuse. Think bold patterns and unexpected color combinations. A retro green bathroom is for someone who doesn’t take design too seriously and wants their space to be a conversation starter. Yes, it’s a little bit kitsch. And that’s the whole point.
How to Go Retro the Right Way
This is a look you have to commit to. Half-hearted retro just looks confused.
- Bold is Beautiful: Don’t be shy. Go for a bright, unapologetic green. A glossy kelly green 4×4 square tile is a perfect starting point.
- Pattern Play: This is the time for bold patterns. A checkerboard floor using green and orange? Go for it. A wall of funky, patterned tile? Absolutely. Retro design was all about clashing colors and patterns with confidence.
- Iconic Shapes: Curved shapes are very retro. Think about a round mirror or a vanity with rounded corners. Kidney shapes and starbursts are also classic retro motifs.
- Unexpected Pairings: Retro design loved odd color combos. Green with orange, pink, or mustard yellow was common. You could bring in these colors through your towels, bath mat, or a piece of art.
A retro green bathroom is about embracing bold colors, funky patterns, and a playful attitude. It’s pure, unadulterated fun.
14. Budget-Friendly Green Tile Ideas

Let’s be real: full bathroom renovations are expensive. The cost of tile, labor, and new fixtures can add up faster than you can say “herringbone pattern.” But what if you’re craving a green tile look without taking out a second mortgage? Good news, you have options.
You don’t have to tile every surface from floor to ceiling to get the impact of green tile. A little bit of strategic tiling or some clever alternatives can give you the look for less.
Getting the Green without Spending Too Much of It
Here are a few of my favorite budget-friendly hacks:
- The Backsplash: Instead of tiling a whole wall, just tile the backsplash area behind your sink. It’s a small area, so you can even splurge on a slightly more expensive tile since you won’t need much of it. It’s a focal point that packs a punch for a low cost.
- Peel-and-Stick Tiles: Okay, hear me out. Peel-and-stick tile technology has come a long way. It’s no longer the flimsy, fake-looking stuff of the past. There are high-quality options that are water-resistant and look surprisingly realistic. They are perfect for a low-cost accent wall or backsplash, and they’re renter-friendly!
- Paint Your Existing Tiles: This is a controversial one, but it can be done. If you have old, dated tiles that are in good condition, you can paint them. You MUST use a special tile paint kit and do the prep work meticulously (cleaning, sanding, priming). It’s not as durable as real tile, but it’s a fantastic short-term solution to update a look on a tight budget.
- Focus on the Floor: Tiling just the floor can be more affordable than doing the walls, and a new floor can completely transform the look of a bathroom. A simple green ceramic tile floor can be surprisingly affordable.
The most important takeaway for a budget project is to be strategic with where you spend your money and consider clever alternatives to traditional tile.
15. Green Tile Bathroom DIY Transformations
Finally, for the brave and the bold, there’s the DIY route. Tiling your own bathroom is a major undertaking, but it is one of the most rewarding home improvement projects you can tackle. Not only does it save you a ton of money on labor, but it gives you an incredible sense of pride and accomplishment every time you walk into the room.
I tiled my own powder room floor with green cement tiles a few years ago, and while there was a lot of measuring, a bit of swearing, and an ungodly amount of grout haze, the end result was worth it. There’s a special connection you have with a space you literally built with your own two hands.
Tips Before You Start Your DIY Journey
If you’re considering this, please do your homework. It’s not as simple as it looks on TV.
- Start Small: If you’ve never tiled before, don’t make a massive, complicated shower your first project. Start with a simple backsplash or a small, square floor. Build your confidence and skills before tackling a more complex job.
- The Right Tools are Everything: Rent or buy the proper tools. A good wet saw for cutting tile is non-negotiable. You’ll also need notched trowels, spacers, a level, a grout float, and sponges. Don’t try to wing it with the wrong equipment.
- Preparation is 90% of the Job: The actual laying of the tile is the fun part. The hard part is the prep. This means ensuring your surface is clean, level, and waterproofed (especially in a shower). Rushing the prep is the number one cause of DIY tile failures.
- Watch a Million Videos: There are thousands of hours of free tutorials online from professional tilers. Watch them. Learn about back-buttering tiles, how to mix thin-set mortar to the right consistency, and the proper way to grout.
A DIY green tile project is the ultimate way to get a completely custom look on a budget while gaining invaluable home improvement skills. Just be patient with yourself and the process.
So, Which Green Will It Be?
Whew! We’ve journeyed from the deepest emerald forests to the freshest minty fields. As you can see, saying you want a “green tile bathroom” is just the beginning of the conversation. The possibilities are practically endless.
The most important thing is to choose a design that speaks to you and the feeling you want to create in your own private space. Do you want to feel energized, calm, glamorous, or playful? There’s a shade of green and a tile design waiting to make that happen.
So go ahead. Be a little brave. Step away from the beige. I promise you won’t regret adding a little bit of life, color, and personality to your bathroom. You deserve a space that makes you smile.